Uncategorized

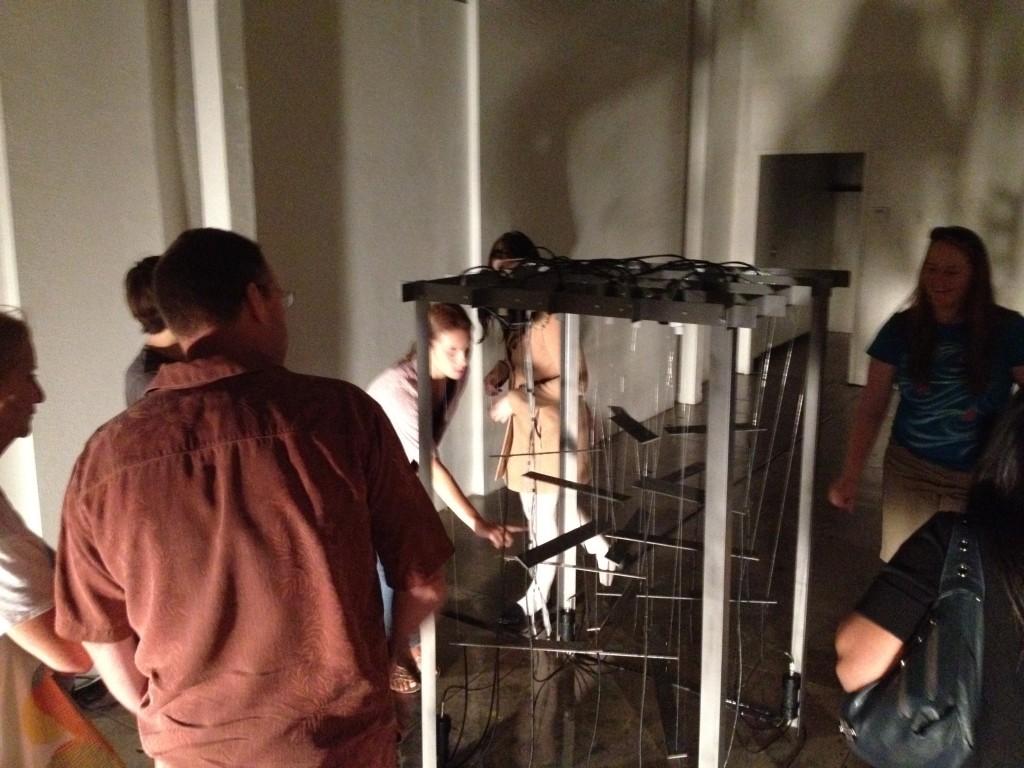
Kinematica at Bits and Pieces, Santa Barbara

Kinematica is a muti-person audio/visual motion capture installation. Taking hold of small infrared controllers, audience members are able to create light and sound through subtle movements of their arms and hands. This results in an electronic soundscape and visualization of human gesture. Because multiple participants interact with the system and each other throughout this process, the resulting audio-visual piece is a collaborative endeavor, similar to a live musical performance.

Art Music Voice of Sisyphus

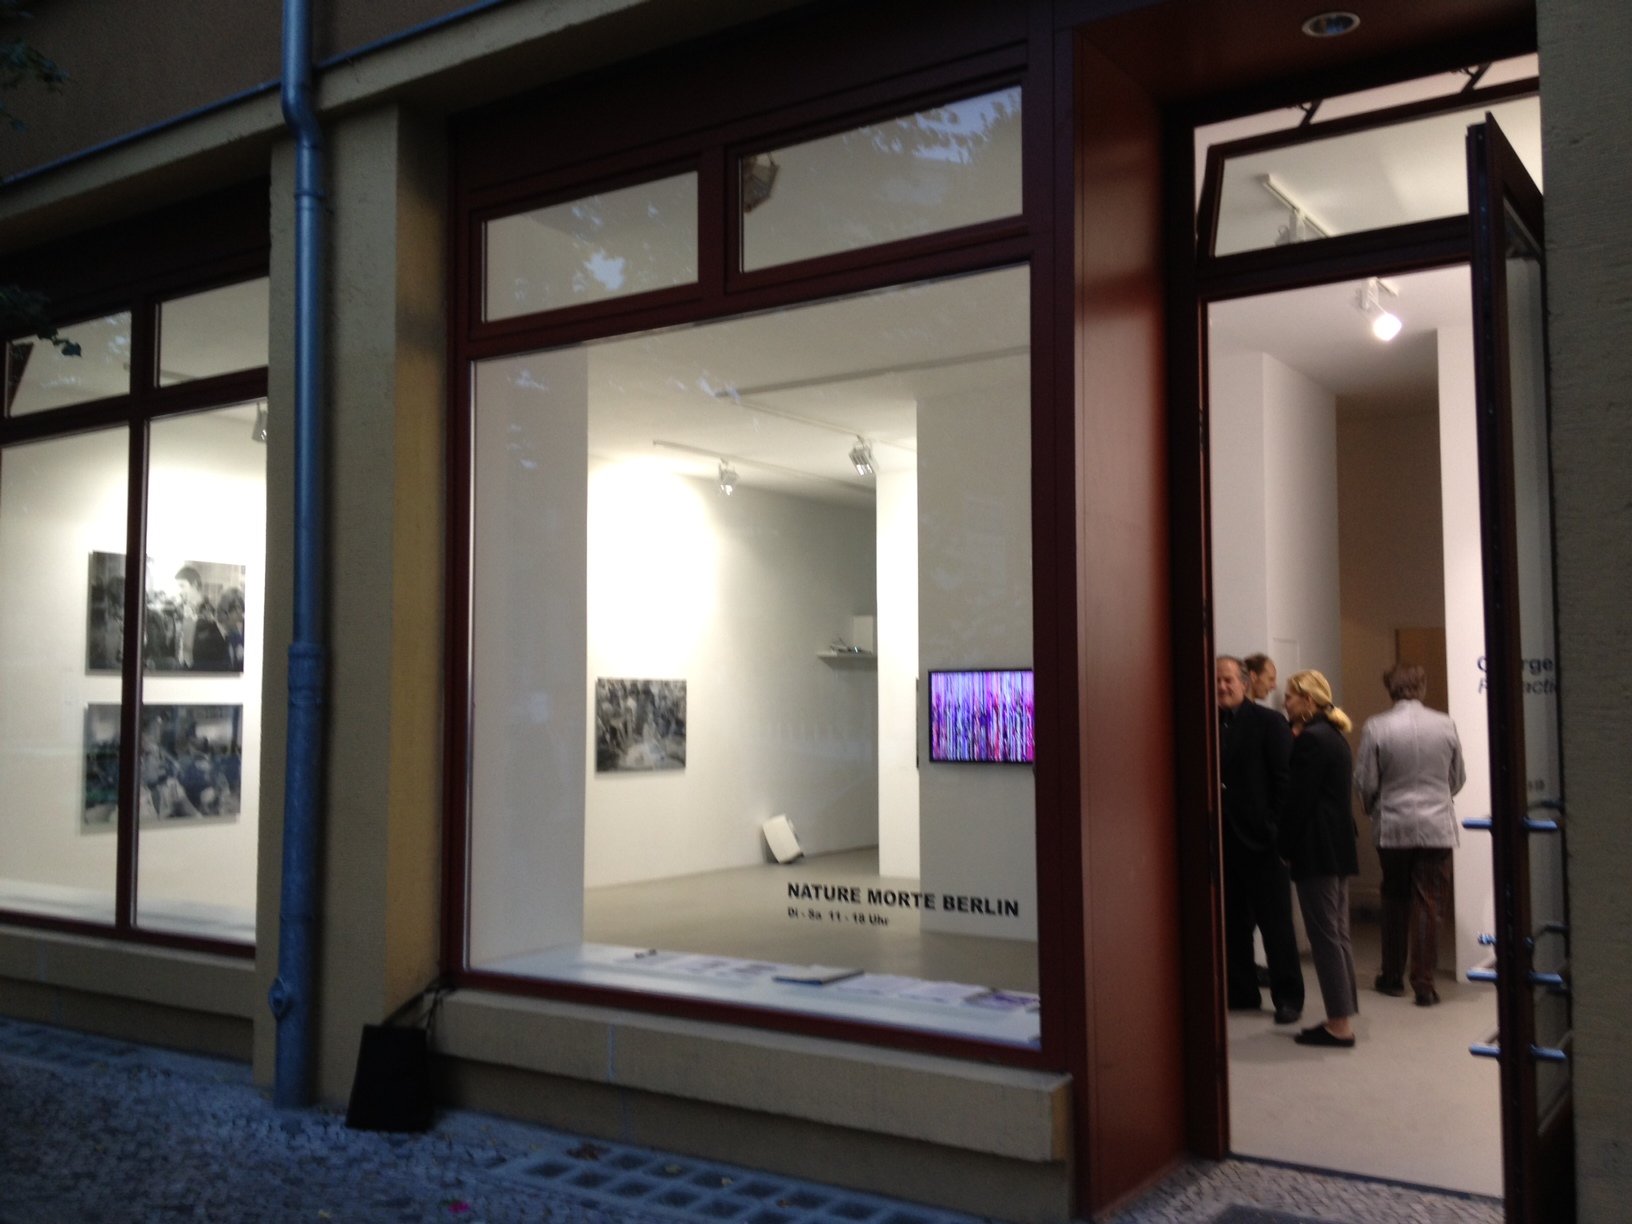
Voice of Sisyphus at Nature Morte Gallery, Berlin

Art Drip Music

Drip at Soundwalk, Long Beach

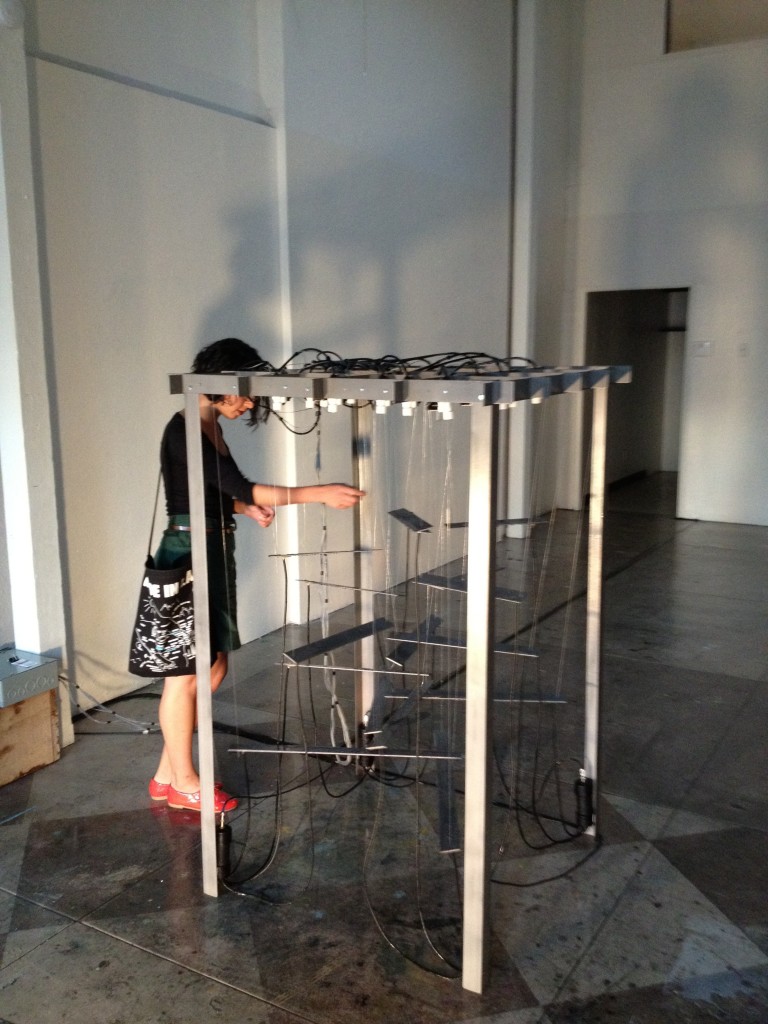
Last Saturday we showed Drip at the 2012 Soundwalk outdoor music festval in Long Beach, CA. The audience seemed to really engage with it and we heard lots of great feedback. In the past we’ve only installed it outside, so this was a pretty strange experience. A puddle quickly gathered on the floor and looked quite dangerous with all the power cables running everywhere, so a few people were too scared to go near it! Most just came right up and started playing though. This is one of the videos that was taken- unfortunately whoever shot it didn’t realize that the piece is a collaboration with Muhammad Hafiz so his name wasn’t included in the credits.

Here are a couple photos from the show:

Code DSP Tutorial

Linkwitz-Riley Filters

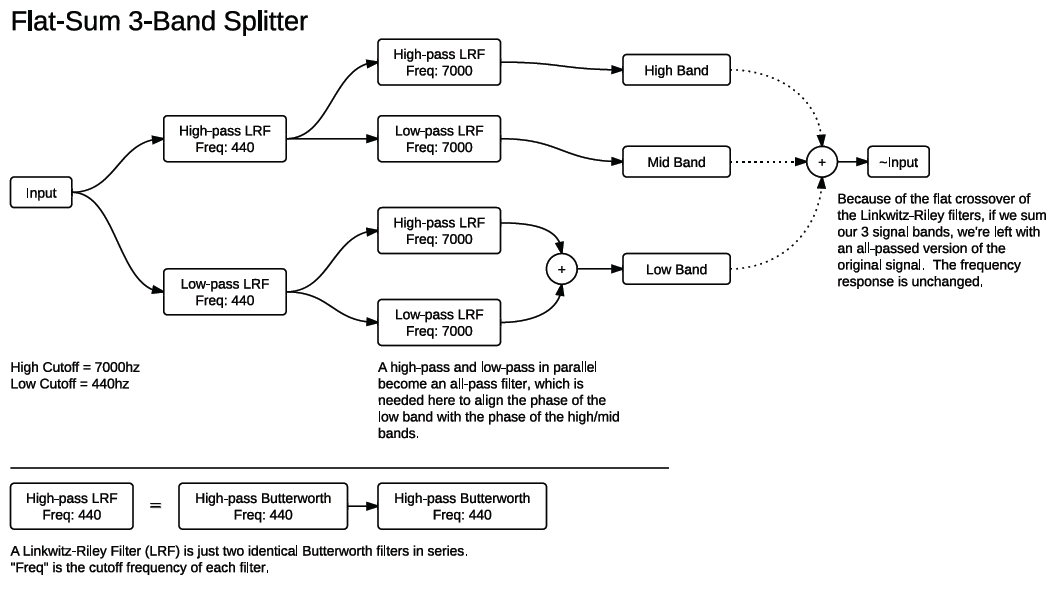
If you’re trying to split an audio signal into three frequency bands without using a costly FFT, the Linkwitz-Riley Crossover technique is a great solution. A Linkwitz-Riley filter is just two identical butterworth filters in series (because of that it’s sometimes called the “Butterworth Squared” filter), which has the unique identity of a perfectly flat crossover point. This means that if you pass a signal through a low-pass and a high-pass version and add the result, you’ll basically get back your original signal (all-passed).

This is a schematic of a 3-band splitter using this principle. Basically, one audio signal is being split in half and then split in half again, giving us 3 separate bands. The only weird thing on the diagram is the two filters in parallel on the low band. These are necessary to align the phase of the bottom with the top two bands. Every time a signal passes through one of these LR filters it gets its phase shifted, so if the bottom band only goes through one filter and the top two bands go through two (one initial and one after the split) then they’ll be out of phase with the bottom and you get bad dips and peaks in the frequency response.

Many, many thanks to Robin Schmidt, a.k.a. RS-MET for help with this tutorial.

Music

Film Reel

A collection of recent cinematic compositions:

1. Tribute to Edward Artemyev

This composition is a study on the work of Eduard Artemyev, the Soviet composer who scored Andrei Tarkovsky’s film “Stalker.” I’m specifically trying to copy the mood of the film’s post-intermission opening sequence, for which Artemyev created a great mix of eastern and western musical identities. The video is a montage of scenes from the movie in chronological order (Tarkovsky’s cinematography never ceases to amaze me…)

2. Futuristic Mechanical Pop

[audio:http://www.amusesmile.com/Music/algodub4.mp3|titles=Industrial Getaway]

3. Atmospheric Piano

[audio:http://amusesmile.com/old/sound/Geiringer.mp3|titles=Geiringer Hall]
Code DSP Tutorial

Audio Programming with Cinder Part III

Part III: Creating an interface with ciUI

At the end of this tutorial we’ll have built a complete FM synthesizer and visualizer as well as a graphical user interface to control it in real-time. Here’s a taste:
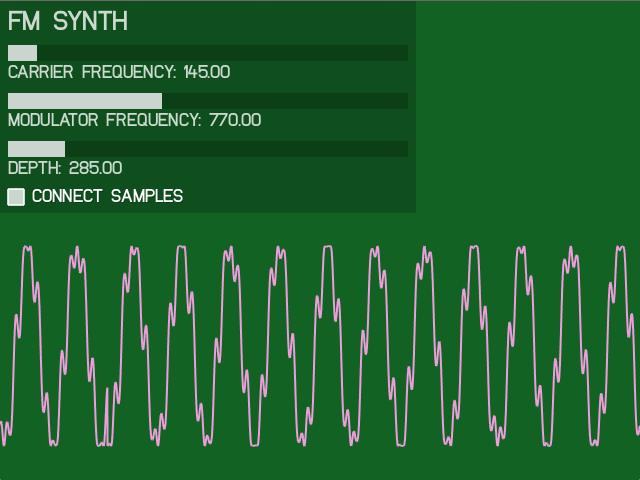
1.  In order to build our interface it’s best not to start completely from scratch.  CiUI is a user interface library for Cinder built by a great designer, programmer, and friend, Reza Ali. It allows you to make customizable GUIs in a quick and relatively painless fashion, which is a perfect way to add control to the FM Synth we built in part two.  Let’s get it installed and working.

(These next steps are adapted from his tutorial, so if anything doesn’t work, refer to his setup instructions directly. Something might have changed since the time I wrote this.)

2. First we need to download the library itself, which can be found here. After downloading and unzipping the library, drag the src (ciUI/src) folder within ciUI into the Source folder in the CinderGammaApp xCode project. When prompted “Choose options for adding these files”, make sure that you leave “Copy items into destination group’s folder (if needed) unchecked”, then press “Finish.” You can rename the resulting “src” folder to ciUI to make things neat and organized.

3. Now we must import a font resource that ciUI will use. Select the Resources folder in xCode and right click. Select the option starts with “Add files to ‘ciUITutorial’ When the file dialog opens, navigate to where ciUI lives within your Blocks folder. Navigate to samples/ciUISimpleExample/xcode and select the “NewMedia Fett.ttf” font file. Make sure that you check “Copy items into destination group’s folder (if needed)”, then press “Finish.” This will copy the font file to your project.

4. The next step is to include ciUI in our program (at the top of CinderGammaApp.cpp):

#include "ciUI.h"

Then create a new ciUICanvas object inside of the CinderGammaApp class:

ciUICanvas *gui;

And add these two functions in the CinderGammaApp class declaration:

void shutdown();
void guiEvent(ciUIEvent *event);

Finally we should add a variable to store the maximum frequency of our synth:

float maxFrequency;

5. Next we need to write the function definitions below (still in the “CinderGammaApp.cpp” file). Adding “delete gui” inside of shutdown() makes sure to delete the interface after we close our application:

void CinderGammaApp::shutdown()
{
    delete gui;
}

void CinderGammaApp::guiEvent(ciUIEvent *event)
{
}

6. Within the setup() function we are going to initialize the gui object itself and add a bunch of widgets to it:

gui = new ciUICanvas(0,0,416,320);

Note: The arguments define the GUI’s top left corner position and width and height. If no arguments are passed then the GUI will position itself on top of the window and the back of the GUI won’t be drawn.

We are now going to initialize our synth’s maximum frequency and then add widgets (a label, and three sliders) to the GUI, in the setup function after creating a new ciUICanvas:

maxFrequency = 2000.0;
gui = new ciUICanvas(0,0,416,320); //ciUICanvas(float x, float y, float width, float height)
gui->addWidgetDown(new ciUILabel("FM SYNTH", CI_UI_FONT_LARGE));
gui->addWidgetDown(new ciUISlider(400, 16, 0.0, maxFrequency, &myFM.carrierFreq, "CARRIER FREQUENCY"));
gui->addWidgetDown(new ciUISlider(400, 16, 0.0, maxFrequency, &myFM.modFreq, "MODULATOR FREQUENCY"));
gui->addWidgetDown(new ciUISlider(400, 16, 0.0, maxFrequency, &myFM.depth, "DEPTH"));

Notice how we pass the address of whatever variable we want our slider to control (&myFM.carrierFreq). This automatically sets up a callback so that whenever the slider is moved, this variable will be changed accordingly and vice versa. The next couple line will tightly fit the canvas to the widgets, and register events with the CinderGammaApp class, and set the UI color theme.

gui->autoSizeToFitWidgets();
gui->registerUIEvents(this, &CinderGammaApp::guiEvent);
gui->setTheme(CI_UI_THEME_DEFAULT);

Note: The second to last line adds a listener/callback, so the gui knows what function to call once a widget is triggered or interacted with by the user, don’t worry if its doesn’t make too much sense right now, you’ll get the hang of it.

7. Now we’ve initialized the GUI and placed a bunch of widgets inside of it, but we need to tell our app to update and display it every frame. We do this by adding these lines to the update and draw functions within the CinderGammaApp class. We’re also going to color the background based on our synth’s current carrier frequency, modulator frequency, and depth which will correspond to amounts of red, green, and blue (RGB) respectively:

void CinderGammaApp::update()
{
    gui->update();
}

void CinderGammaApp::draw()
{
    gl::clear(Color(myFM.carrierFreq/maxFrequency, myFM.modFreq/maxFrequency, myFM.depth/maxFrequency));
    gui->draw();
}

At this point you can actually control our synthesizer in real time through the use of the sliders we set up. Every time one of them is moved, the variable we told it to point to is changed, which in turn changes the resulting sound. Have fun playing around with it for a minute- we’ve certainly come a long way from our sine wave in part one.

8. Ok awesome- we’re creating these complex waveforms through Frequency Modulation synthesis. But now let’s visualize them. First add a vector of floats inside of the CinderGammaApp class to hold a buffer full of sample values that we’ll use to draw our visualization. Also create an int to hold the vector’s offset (this is necessary for the audio loop to fill it up properly from frame to frame). Finally, we’re going to add a boolean (true/false) value to determine whether or not we want to draw our samples connected as a line or separated as little dots:

vector visualBuffer;
int visualBufferOffset;
bool connectSamples;

9. Now in setup() we’re going to fill our vector with 4000 zeros and initialize our offset to 0. While we’re at it, we’re also going to add a toggle widget to set the boolean connectSamples variable to true/false:

void CinderGammaApp::setup()
{
    visualBuffer.resize(4000,0.0);
    visualBufferOffset = 0;
    ...
    gui->addWidgetDown(new ciUIToggle(16, 16, &connectSamples, "CONNECT SAMPLES"));
}

10. Now we add this in the draw() function. This is the code which actually draws the lines or dots that will create our visualization. If it’s confusing just go through it step by step. First we create a constant float called padding, which is just the number of pixels that we want to leave as free space below our wave. Then we set the height of our wave. Next we determine a width offset, which is just the size of the window divided by the size of our buffer (because we’re about to iterate over our entire buffer, drawing a point for each value and we need to know how far to move over at each step). Then we create an openGL color which is the oposite of our background color. Next we determine if that connectSamples boolean is true or false. If it’s true we draw a line, and if it’s false we draw unconnected dots. Finally, we actually iterate through our entire vector drawing amplitude values at each bin. We then end our shape using glEnd():

//draw the visual buffer every frame
const float padding = 35.0;
const float waveHeight = 100.0;
float widthOffset = (float)getWindowWidth()/visualBuffer.size();
gl::color(Color(1.0-myFM.carrierFreq/maxFrequency, 1.0-myFM.modFreq/maxFrequency, 1.0-myFM.depth/maxFrequency));
if(connectSamples == true){
    glBegin(GL_LINE_STRIP);
}
else{
    glBegin(GL_POINTS);
}
for(int i = 0;i<visualBuffer.size();i++) {
    gl::vertex(i*widthOffset, getWindowHeight()-(waveHeight+padding+(waveHeight*visualBuffer[i])));
}
glEnd();

11. But where were those amplitude values coming from? We need to actually fill our visualBuffer vector inside of the audio callback. We use the visualBufferOffset to keep track of what sample we’re supposed to be filling so that the audio callback doesn’t just fill the first 512 samples each frame:

void CinderGammaApp::myAudioCallback( uint64_t inSampleOffset, uint32_t ioSampleCount, audio::Buffer32f * ioBuffer )
{
    for ( uint32_t i = 0; i < ioSampleCount; i++ ) {
        float tempVal = myFM();
        ioBuffer->mData[ i * ioBuffer->mNumberChannels ] = tempVal;
        ioBuffer->mData[ i * ioBuffer->mNumberChannels + 1 ] = tempVal;

        visualBuffer[visualBufferOffset%visualBuffer.size()] = tempVal;
        visualBufferOffset = (visualBufferOffset+1)%visualBuffer.size();
    }
}
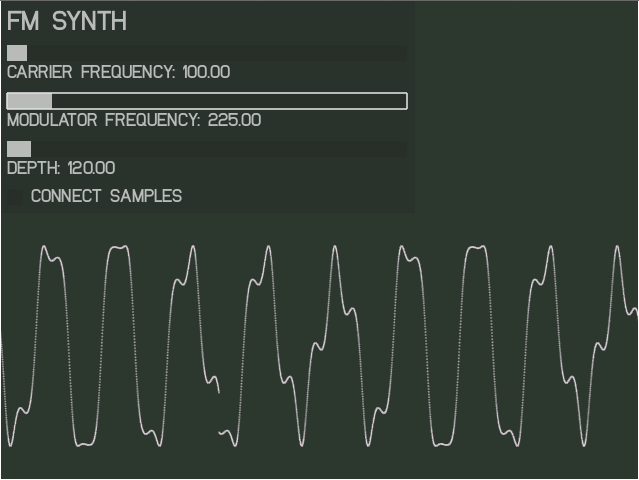
Great, so now we have the final, finished program: An FM synthesizer and multi-mode visualizer which can be performed in real time. Not to mention that we did this all in just 121 lines of code! We’ve seen how to use the Gamma Synthesis library inside of Cinder which gives us access to dozens of useful mathematical generators and functions that can be used to create audio and visuals (honestly, we didn’t even scratch the surface). We’ve also seen how to use the ciUI library to create efficient, powerful, and well designed user interfaces for our future Cinder applications.

Thanks for sticking around, I hope you found this helpful, and please send me any feedback or cool things that you make using these techniques.

Here’s the full program:

#include "cinder/app/AppBasic.h"
#include "cinder/gl/gl.h"
#include "cinder/audio/Output.h"
#include "cinder/audio/Callback.h"
#include "examples.h"
#include "ciUI.h"

using namespace ci;
using namespace ci::app;
using namespace std;

struct FM {
    float carrierFreq;
    float modFreq;
    float depth;
    Sine<> carrier;
    Sine<> mod;
    FM(){
    }
    float operator()(){
        mod.freq(modFreq);
        carrier.freq(carrierFreq+(mod()*depth));
        return carrier();
    }
};

class CinderGammaApp : public AppBasic {
public:
    void setup();
    void mouseDown( MouseEvent event );
    void update();
    void draw();
    void myAudioCallback( uint64_t inSampleOffset, uint32_t ioSampleCount, ci::audio::Buffer32f * ioBuffer );
    void shutdown();
    void guiEvent(ciUIEvent *event);
private:
    FM myFM;
    ciUICanvas *gui;
    float maxFrequency;
    bool connectSamples;
    vector visualBuffer;
    int visualBufferOffset;
};

void CinderGammaApp::setup()
{
    visualBuffer.resize(4000,0.0);
    visualBufferOffset = 0;

    audio::Output::play( audio::createCallback( this, & CinderGammaApp::myAudioCallback ) );
    Sync::master().spu(44100.0);

    myFM.carrierFreq = 300.0;
    myFM.modFreq = 20.0;
    myFM.depth = 20.0;
    maxFrequency = 2000.0;

    gui = new ciUICanvas(0,0,416,320); //ciUICanvas(float x, float y, float width, float height)
    gui->addWidgetDown(new ciUILabel("FM SYNTH", CI_UI_FONT_LARGE));
    gui->addWidgetDown(new ciUISlider(400, 16, 0.0, maxFrequency, &myFM.carrierFreq, "CARRIER FREQUENCY"));
    gui->addWidgetDown(new ciUISlider(400, 16, 0.0, maxFrequency, &myFM.modFreq, "MODULATOR FREQUENCY"));
    gui->addWidgetDown(new ciUISlider(400, 16, 0.0, maxFrequency, &myFM.depth, "DEPTH"));
    gui->addWidgetDown(new ciUIToggle(16, 16, &connectSamples, "CONNECT SAMPLES"));
    gui->autoSizeToFitWidgets();
    gui->registerUIEvents(this, &CinderGammaApp::guiEvent);
    gui->setTheme(CI_UI_THEME_DEFAULT);
}

void CinderGammaApp::mouseDown( MouseEvent event )
{
}

void CinderGammaApp::update()
{
    gui->update();
}

void CinderGammaApp::draw()
{
    gl::clear(Color(myFM.carrierFreq/maxFrequency, myFM.modFreq/maxFrequency, myFM.depth/maxFrequency));
    gui->draw();

    //draw the visual buffer every frame
    const float padding = 35.0;
    const float waveHeight = 100.0;
    float widthOffset = (float)getWindowWidth()/visualBuffer.size();
    gl::color(Color(1.0-myFM.carrierFreq/maxFrequency, 1.0-myFM.modFreq/maxFrequency, 1.0-myFM.depth/maxFrequency));
    if(connectSamples == true){
        glBegin(GL_LINE_STRIP);
    }
    else{
        glBegin(GL_POINTS);
    }
    for(int i = 0;i<visualBuffer.size();i++) {
        gl::vertex(i*widthOffset, getWindowHeight()-(waveHeight+padding+(waveHeight*visualBuffer[i])));
    }
    glEnd();
}

void CinderGammaApp::shutdown()
{
    delete gui;
}

void CinderGammaApp::guiEvent(ciUIEvent *event)
{
}

void CinderGammaApp::myAudioCallback( uint64_t inSampleOffset, uint32_t ioSampleCount, audio::Buffer32f * ioBuffer )
{
    for ( uint32_t i = 0; i < ioSampleCount; i++ ) {
        float tempVal = myFM();
        ioBuffer->mData[ i * ioBuffer->mNumberChannels ] = tempVal;
        ioBuffer->mData[ i * ioBuffer->mNumberChannels + 1 ] = tempVal;

        visualBuffer[visualBufferOffset%visualBuffer.size()] = tempVal;
        visualBufferOffset = (visualBufferOffset+1)%visualBuffer.size();
    }
}

CINDER_APP_BASIC( CinderGammaApp, RendererGl )
Code DSP Tutorial

Audio Programming with Cinder Part II

Part II: Adding Gamma to Cinder

Cinder has many great tools for programming visuals, however its audio functions leave much to be desired. As a solution, this tutorial will focus on adding the Gamma “generic synthesis” library  to our application. Gamma is authored by my friend and colleague Dr. Lance Putnam and includes dozens of efficient tools for signal processing that we’ll use throughout the rest of this tutorial (and hopefully after).

1. Download the latest version of Gamma here (where is says “Stable Release”). Unzip the folder and cd into it from a terminal. Then build the library by typing “make” and install it to your /usr/local folders by typing “sudo make install” and entering your password. You should now have Gamma’s header files included in /usr/local/include/Gamma and the compiled library (libGamma.a) inside of /usr/local/lib. Gamma also relies on PortAudio and libsndfile, so it will also include libportaudio.a and libsndfile.a in /usr/local/lib.

2. Inside of the Gamma open the examples folder. You should see a file called “examples.h”. Drag this file into the source folder of your Cinder Xcode project and check “Copy item into destination group’s folder.” We then need to include the examples.h file which in turn includes header files for most of Gamma:

#include "examples.h"

If we try to run our app at this point, it’s not going to build because we haven’t told the Xcode project where to look for these Gamma header files that we’re telling it to include. To do this click on your project’s icon in the project navigator window (on the left hand side of the screen where it says “CinderGamma” with a little blue icon). This should open up a menu with our project settings. Click the “Build Settings” tab and in the search bar enter “Header Search Path”. Double click to the right of the Header Search Path line and a little box should pop up. Click the “+” icon to add a folder. Then type in “/usr/local/include” and hit enter. Now if you click “Run” your project should build successfully.

3. In order to actually use any of Gamma’s classes and functions, we need to link our project to the compiled libGamma.a library. Click on your project’s icon again to open the project’s settings. Click the “Build Settings” tab and in the search bar enter “Library Search Path”. Double click to the right of the Library Search Paths line and a little box should pop up. Click the “+” icon to add a folder. Then type in “/usr/local/lib” and hit enter. Now we should be all ready to use Gamma. (Sometimes you need to explicitly tell Xcode what libraries to link to. If you’re getting linking errors after this step, search for “flags” in project settings and double click next to other linker flags. Then hit the “+” icon and add “-lGamma”)

4. Now we can use Gamma’s wide range of unit generators to make noise. As an initial test, let’s re-create that sine tone we made in the last part using Gamma’s Sine class. First we add an instance of Sine to our app class:

Sine<> mySine;

We then initialize Gamma’s master Sync to the sample rate we’re using and ititialize our sine tone generator to 300 hz using the freq(x) function:

Sync::master().spu(44100.0);
mySine.freq(300.0);

And finally we need to update our audio callback to generate and store a new sample from our generator each frame:

float tempVal = mySine();
ioBuffer->mData[ i * ioBuffer->mNumberChannels ] = tempVal;
ioBuffer->mData[ i * ioBuffer->mNumberChannels + 1 ] = tempVal;

Gamma uses the generator pattern quite extensively, which means that the () operator is overloaded, enabling us to both generate a new sample and return the current one just by calling mySine(). It might look confusing but it will become extremely convenient in our next step. Here’s the full program which generates a 300 hz sine tone using Gamma:

#include "cinder/app/AppBasic.h"
#include "cinder/gl/gl.h"
#include "cinder/audio/Output.h"
#include "cinder/audio/Callback.h"
#include "examples.h"

using namespace ci;
using namespace ci::app;
using namespace std;

class CinderGammaApp : public AppBasic {
public:
    void setup();
    void mouseDown( MouseEvent event );
    void update();
    void draw();
    void myAudioCallback( uint64_t inSampleOffset, uint32_t ioSampleCount, ci::audio::Buffer32f * ioBuffer );
private:
    float phaseIncrement;
    float phase;
    Sine<> mySine;
};

void CinderGammaApp::setup()
{
    audio::Output::play( audio::createCallback( this, & CinderGammaApp::myAudioCallback ) );
    Sync::master().spu(44100.0);
    mySine.freq(300.0);
}

void CinderGammaApp::mouseDown( MouseEvent event )
{
}

void CinderGammaApp::update()
{
}

void CinderGammaApp::draw()
{
    // clear out the window with green
    gl::clear( Color( 0, 0.7, 0.0 ) );
}

void CinderGammaApp::myAudioCallback( uint64_t inSampleOffset, uint32_t ioSampleCount, audio::Buffer32f * ioBuffer )
{
    for ( uint32_t i = 0; i < ioSampleCount; i++ ) {
        phase += phaseIncrement;
        float tempVal = mySine();
        ioBuffer->mData[ i * ioBuffer->mNumberChannels ] = tempVal;
        ioBuffer->mData[ i * ioBuffer->mNumberChannels + 1 ] = tempVal;
    }
}

CINDER_APP_BASIC( CinderGammaApp, RendererGl )
5. Ok this is great but now that we have access to Gamma, let’s make something more complicated that a sine tone. We’re going to make an FM struct that stores a carrier frequency, a mod frequency, a depth, and the carrier and modulator sine tone generators themselves. We also give it an overloaded () function which updates sets the carrier frequency based on the modulator’s phase times depth and returns the next sample:

struct FM {
    float carrierFreq;
    float modFreq;
    float depth;
    Sine<> carrier;
    Sine<> mod;
    FM(){
    }
    float operator()(){
        mod.freq(modFreq);
        carrier.freq(carrierFreq+(mod()*depth));
        return carrier();
    }
};

We also need to add an instance of this FM struct to our main app.

FM myFM;

In setup() we should initialize the values we want for our carrier frequency, mod frequency, and depth:

myFM.carrierFreq = 300.0;
myFM.modFreq = 20.0;
myFM.depth = 20.0;

And then finally we make sure this is called in our audio loop. The overloaded () operator allows us to just call myFM() every frame which both updates our synth and returns the next sample (remember- this is called the generator pattern and it rocks).

float tempVal = myFM();
ioBuffer->mData[ i * ioBuffer->mNumberChannels ] = tempVal;
ioBuffer->mData[ i * ioBuffer->mNumberChannels + 1 ] = tempVal;

Here’s the complete program which outputs a frequency modulated sine tone. Later on in part three we’re going to add a user interface so that we can actually control our synth in real time:

#include "cinder/app/AppBasic.h"
#include "cinder/gl/gl.h"
#include "cinder/audio/Output.h"
#include "cinder/audio/Callback.h"
#include "examples.h"

using namespace ci;
using namespace ci::app;
using namespace std;

struct FM {
    float carrierFreq;
    float modFreq;
    float depth;
    Sine<> carrier;
    Sine<> mod;
    FM(){
    }
    float operator()(){
        mod.freq(modFreq);
        carrier.freq(carrierFreq+(mod()*depth));
        return carrier();
    }
};

class CinderGammaApp : public AppBasic {
public:
    void setup();
    void mouseDown( MouseEvent event );
    void update();
    void draw();
    void myAudioCallback( uint64_t inSampleOffset, uint32_t ioSampleCount, ci::audio::Buffer32f * ioBuffer );
private:
    FM myFM;
};

void CinderGammaApp::setup()
{
    audio::Output::play( audio::createCallback( this, & CinderGammaApp::myAudioCallback ) );
    Sync::master().spu(44100.0);

    myFM.carrierFreq = 300.0;
    myFM.modFreq = 20.0;
    myFM.depth = 20.0;
}

void CinderGammaApp::mouseDown( MouseEvent event )
{
}

void CinderGammaApp::update()
{
}

void CinderGammaApp::draw()
{
    // clear out the window with green
    gl::clear( Color( 0, 0.7, 0.0 ) );
}

void CinderGammaApp::myAudioCallback( uint64_t inSampleOffset, uint32_t ioSampleCount, audio::Buffer32f * ioBuffer )
{
    for ( uint32_t i = 0; i < ioSampleCount; i++ ) {
        float tempVal = myFM();
        ioBuffer->mData[ i * ioBuffer->mNumberChannels ] = tempVal;
        ioBuffer->mData[ i * ioBuffer->mNumberChannels + 1 ] = tempVal;
    }
}
CINDER_APP_BASIC( CinderGammaApp, RendererGl )